Gravity Simulator
See the Script at: http://www.pasteall.org/21810/python
enjoy. :)
Friday 20 May 2011
Saturday 19 February 2011

Thursday 17 February 2011
Volumetric Scattering: in luxrender 0.8RC1, Part 1
 | |
|
There are two main uses of Volumetric Scattering: |
- Atmospheric Scattering, (god rays) where light is scatted in the atmosphere or other mediums (eg water).
- Sub Surface Scattering (SSS) where light is dispersed within the material, (eg skin, plants, organics, some plastics ect)
Atmospheric Scattering:
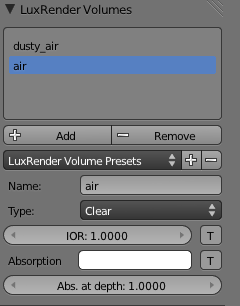
 The homogeneous Volumetric Material is used to create this effect:
(see right default settings as used in the scene above)
Materials:
when setting up light rays one can make the entire environment use this volumetric material, however this can lead to much increased render time with very little visual improvement. so it is best to only assign the dusty_air volume where it is used. here in this example. the windows are a null material with the dusty_air set as internal volume, (note the normals are facing out).
All other materials in this scene have the external material set as air. So only light that has just passed through the null window material will scatter, light that has subsequently bounced will not scatter. (note that if you have a highly reflective/refractive object in the path of a ray, eg a mirror, glass ball etc. i is best to set that objects external material to dust as well since there will be a focus of light coming of it creating volumetric caustics.
(see bellow right default settings for a Clear volume.)
 In this scene there is a lamp in the background is a simple point source lamp, one could of course use a mesh emitter, this lamp has the dusty_air set as its exterior medium. The lamp shade is the rough Glass Martial and for speed improvements has the Clear air material set.
There is a sun+sky lamp, this lamp creates the (god ray) effect. however to further improve performance its external medium is air, so that only light that passes though the window will scatter and no light beforehand.
Setting Up the Scene:
firstly note that all the external walls+windows are all one joined complete mesh. The makes keeping track of the normals easyer, (luxrender uses the normals to differentiate the internal/external mediums), in this model the normals are all facing out, (eg we are looking at int inside of the mesh. thus the martial on the windows as discussed above has the dusty air set as its internal martial since the windows has no thickness.
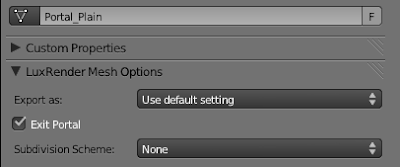 To improves render time, one can place a portal outside of the windows so that the renderer knows to focus its ray-calculations to that portal. thus dramatically improving the chance of finding a ray/light. A portal is just a plane with the normal facing int the desired exit direction of the light, you must check the portal property in the mesh properties panel. (see right mesh settings settings for a portal plain.)
Rendering Settings:
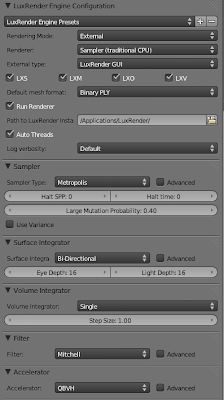
When using volumetric scattering the Bi-Directional integrator seems to work best. (see right render settings settings.)
 In this scene there is a lamp in the background is a simple point source lamp, one could of course use a mesh emitter, this lamp has the dusty_air set as its exterior medium. The lamp shade is the rough Glass Martial and for speed improvements has the Clear air material set.
There is a sun+sky lamp, this lamp creates the (god ray) effect. however to further improve performance its external medium is air, so that only light that passes though the window will scatter and no light beforehand.
Setting Up the Scene:
firstly note that all the external walls+windows are all one joined complete mesh. The makes keeping track of the normals easyer, (luxrender uses the normals to differentiate the internal/external mediums), in this model the normals are all facing out, (eg we are looking at int inside of the mesh. thus the martial on the windows as discussed above has the dusty air set as its internal martial since the windows has no thickness.
 To improves render time, one can place a portal outside of the windows so that the renderer knows to focus its ray-calculations to that portal. thus dramatically improving the chance of finding a ray/light. A portal is just a plane with the normal facing int the desired exit direction of the light, you must check the portal property in the mesh properties panel. (see right mesh settings settings for a portal plain.)
Rendering Settings:
When using volumetric scattering the Bi-Directional integrator seems to work best. (see right render settings settings.)
Friday 14 January 2011
Setting up The Partial fluid test:
fisrt of all here http://www.pasteall.org/blend/4769 is the blender file feel free to play with it as much as you like :)
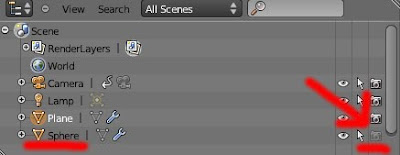
so to set up the system the fluid is being pored into a bowl. (this is half of a uv sphere that has been scaled up the z a bit to make it less deep.) sothat the fluid partical will colid withthis bowl it is important for it to be on the same layer as the parical system, but we dont want the bowl to render so, in the Outliner, you clikc the camra to the right of the bowl: (so that is is greyed out)

The next step is to make it a colidable object:


(left fram 500)
so to set up the system the fluid is being pored into a bowl. (this is half of a uv sphere that has been scaled up the z a bit to make it less deep.) sothat the fluid partical will colid withthis bowl it is important for it to be on the same layer as the parical system, but we dont want the bowl to render so, in the Outliner, you clikc the camra to the right of the bowl: (so that is is greyed out)
(note i did not rename the sphere so it is still called sphere)

The next step is to make it a colidable object:
(you can use the defalt values)
Next: Set up the fluid sim. on a small plane facing into the bowl. you can use the defalt fluid settings for that as well i used 5000 particals,

Next set up the strand visuatation:
(not to use the path render option you need to Bake the particals first)
the path settings will draw the path of the partical over a set time interval:
to make this path segment move along the total path of the particals over time, i keyframed the interval at fram 0 and 500. (above left is fram 0)

notice the small difference in time step:
so if a particle is moving fast it will create a longer path than one moving slowly.
from here i just set up some nice materials for the path so that is fades out ect.
Thursday 13 January 2011
fluid particals
this is just a nice visulatiation of some of blenders fluid particles. If anyones intrested in how i set this up i could do a quick tutorial .
Subscribe to:
Posts (Atom)