Thursday, 25 March 2010

Keyboard map update.

I have msot of the edit mode (for mesh) and object mode buttons in blender 2.5 alpha 2:


(click to enlarge)

while making this i have nottest that some keys seem over used (eg the 's' key) and others like '[' ']' '\' '/' '`' 'k' 'y' 'j' 'v' 'x' ';'

there are also some conflicting keys, such as shift+f is fly mode, (which should work in both edit and object) however since shift+f is mesh fill (fly mode doesn't work in edit mode without changing the shortcuts)

please leave your comments, on other conflicts you have found, allso on how i might best depict the diffident content on the keyboard?

Wednesday, 24 March 2010

blender 2.5 Alpha 2 Keyboard shortcuts map, on its way

i have jsut started creating a map of the keyboard short-cuts for blender 2.5 alpha 2 see here:


there is still a long way to go.

Monday, 22 March 2010

testing the render branch of blender 2.5

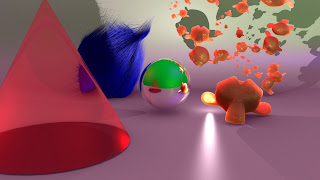
I used my test scene from the previous post on blender render25 branch (32 bit) [27656]
on blender 2.49b I got this as before:
Time: 1h 6m 21s = 3981 seconds


On blender render25 branch:
Time:13m 28s = 748s
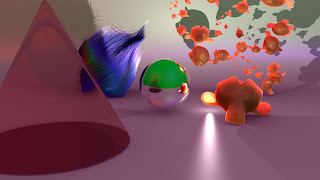


blender render was 5.3 times faster than blender 2.49b and it was 1.6 times faster than blender 2.5 alpha 2.

Comparison of image:
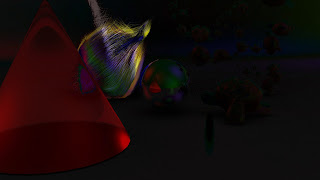
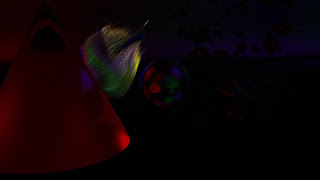
The Hair was by far the slowest part of the render here. also do take note of the colouration of the fur and cone. Unlike in the normal blender 2.5 alpha (see previous post) the monkey is an almost perfect replica of that in blender 2.49b.
see difference map: of blender 2.49b and blender render25


And see map of: blender 2.5 alpha 2 and blender render25


system and render settings:
the cone in ray-traced transparency, the sphere is a ray-traced mirror, the hair is using zbuff to fade the ends, the monkey is repeated by a array modifier, and has SSS. the background is a NURBS surface. there are 4 colored lights. (rendered on mac book pro 0sx 10.6, 2.53 core 2 duo, 4GB 1067 NHz DD3 ram, )

Thursday, 11 March 2010

rendering improments in 2.5 alpha 2

here is a test render:
the cone in raytraced trasparency, the sphere is a raytrased mirro, the hair is using zbuff to fade the ends, the monky is repeated by a array modiphier, and has SSS. the backround is a NURBS surface. there are 4 colored lights. (renderd on mac book pro 0sx 10.6, 2.53 core 2 duo, 4GB 1067 NHz DD3 ram, )

blender 2.49b
time: 1h 6m 21s = 3981 seconds


blender 2.5 alpha 2
time: 19m 54s = 1194 seconds


this shows more than the 3 times speed up.
here is a diffrence map of the two results:
one can see that the hair paticals in blender 2.49b where rendered larger than those in 2.5, there is a slight color diffrence, and the bump map on the monky is aplied with diffrent intesity.

Tuesday, 9 March 2010

blender 2.5 doc,

I propose that it is time for the comnity to start work on the blender 2.5 manual,
due to the great interface changes in blender 2.5 there alot more work updateing the manual for this release than that for preivus releases.

Tuesday, 6 October 2009

New RayTraing Optermisations in trunk


to test the new ray-traing optimisations i chose a slightly unusual test: a very high poly scene with ambient (ray-traced lighting) (left, the legs each have just over 6 million vertices, the total seen has just under 23 million verities, a lot!!! )
in blender 2.48b it took 46 minutes and 1 second to produce this.
in blender2.5 r23664 it took 6 minutes and 3 second.
My secondray system wich this test was run on is and old linux box with a 1.8Ghz single core Amd and one gb of ram, the file size is just over 780mb.

edit: i used the following render settings:
AO ray traced 5 samples using add, and plain.
osa:8
50%:HD size
all object have no define material
and one sun raysadowed

Thursday, 24 September 2009

Voxel sculting


Raul has stated a new project on voxel sculpting, as he mentions a good example of this in 3d-coat since this is a new concept of modelling/sculpting i downloaded the trial version of 3d-coat (available for win/linux/osx) and writhing 2 minutes was creating:


a underwater rock-formation. Admittedly i was using the materials and brushes supplied with 3d-coat.


The Voxel sculpting work-flow is such that as you extend the object it adds resolution to that extension. the result is that you never end up having a mesh with to low a resolution for your current brush to have effect. of course you can increase the inter resolution (using multi-res) however this will create lots of resolution were you don't need it thus slowing down your system.